Automation Engine
← Back to Home · Engine internals: Automation System · API: API Reference
Turns game events into automations: a trigger fires, filters decide who reacts, and your code, a flow, or a macro runs.
Engine internals (full trigger list, evaluate / activation / onInit callbacks, cancel and modify, client and socket execution) are in Automation System.
What's automated by default
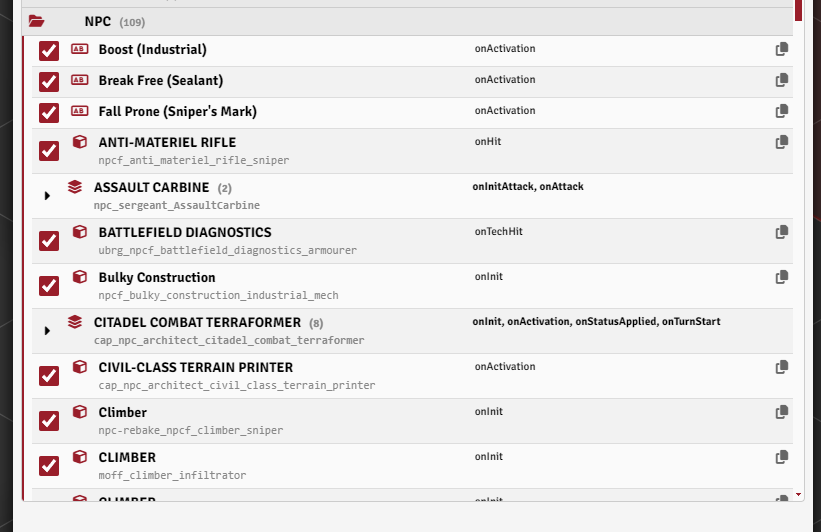
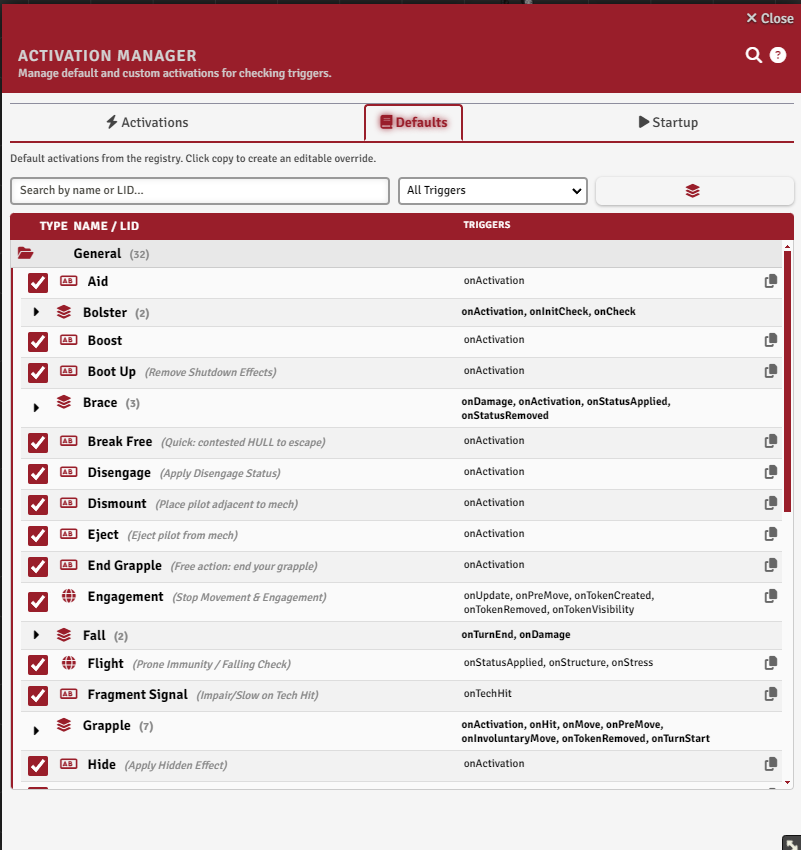
Two things ship enabled, both listed on the Defaults tab of the Activation Manager.
The base actions. Overwatch, Brace, Engagement, Disengage, Ram, Boost, Overcharge, Lock On, Bolster, Stabilize, Eject, Reactor Meltdown, Hide, Scan, Mount and the rest of the general reactions.
A short list of LID-keyed item automations. Custom Paint Job, Limitless, Treads or Hover, Limited Melee Attacks (ships and vehicles), No Manipulators, Limited Handling, and Veterancy, each keyed to the item's LID and firing for any actor that owns it.
Beyond those, an item automation is yours to write, and the Activation Manager is where you do it. The larger personal activation set is a separate opt-in.
The Activation Manager
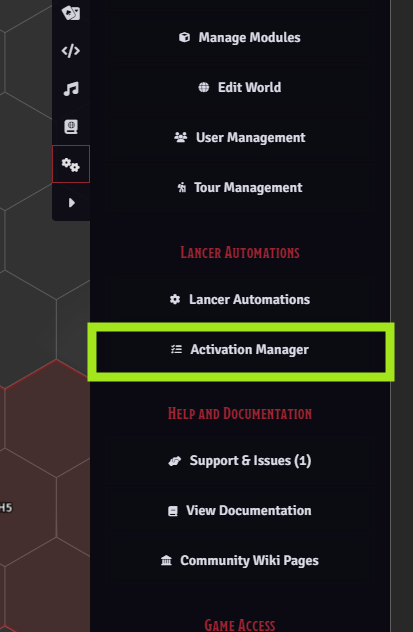
Register, modify, and copy automations. Open it from the Lancer Automations settings.
It has two kinds of entries:
- Item-based automations are tied to a Lancer item by its LID. Only tokens that own that item can react. You can also bind one to a deployable LID, or to a specific Actor UUID, so it reacts only as that one exact actor instead of every actor with the item.
- General automations aren't tied to any item. Any token in the scene can react, filtered by the rules you set.
Entries can be sorted into named folders. The four tabs are Activations, Defaults, Startup and Workshop.
Each activation has an enable / disable toggle. It works per sub-reaction on a multi-reaction item, and on the built-in and personal-set automations too (the toggle is saved as your own override, so disabling a built-in one sticks).
Changing a built-in automation
You can't edit a built-in directly. Three ways around it:
| Want | Do |
|---|---|
| Turn it off | The enable toggle. Saved, so updates don't undo it. |
| Change it | Edit it. Your version is saved over the default. |
| Make a variant | Copy to Custom (copy icon on the row, Defaults tab only). Makes an editable copy and opens it. The original stays. |
To replace a built-in: copy it, edit the copy, disable the original.
All of this is saved in your world, not the module, so updates never overwrite it. Export / Import moves it to another world.
Finding an item's LID
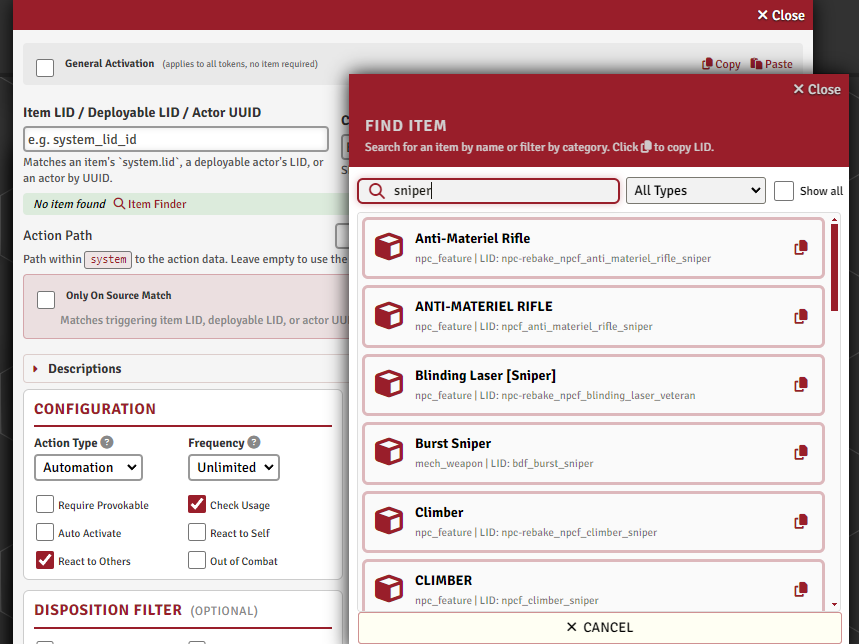
Item-based automations need the item's LID. Three finder buttons sit next to the LID field in the editor: Item browses your world and compendium items, Deploy lists deployable LIDs, Actor picks an Actor UUID. A separate Find Action button beside the Action Path field lists every action inside the selected item with the path to paste. A deployable can be set to react to its own deploy (the onDeploy trigger), covered in Automation System.
Configuring an activation
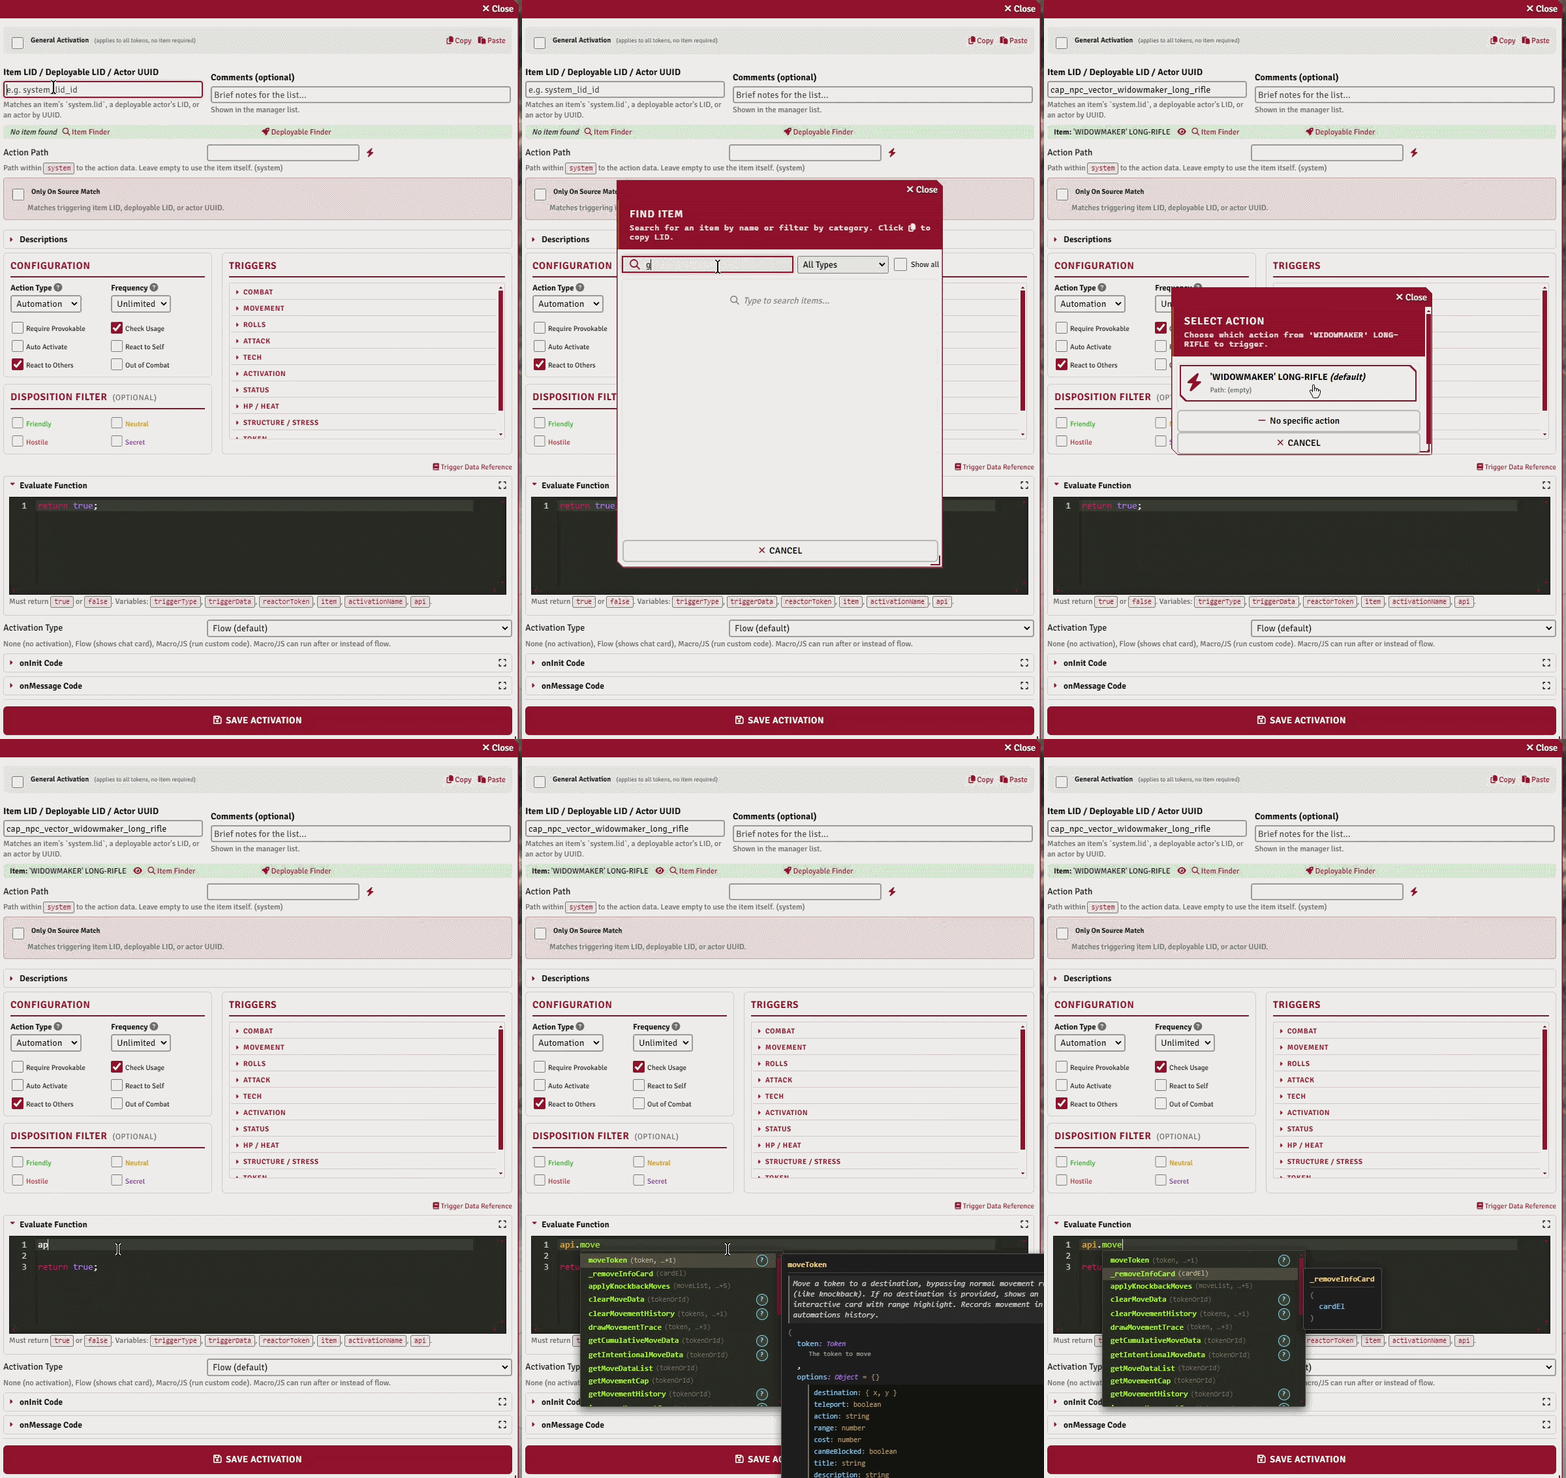
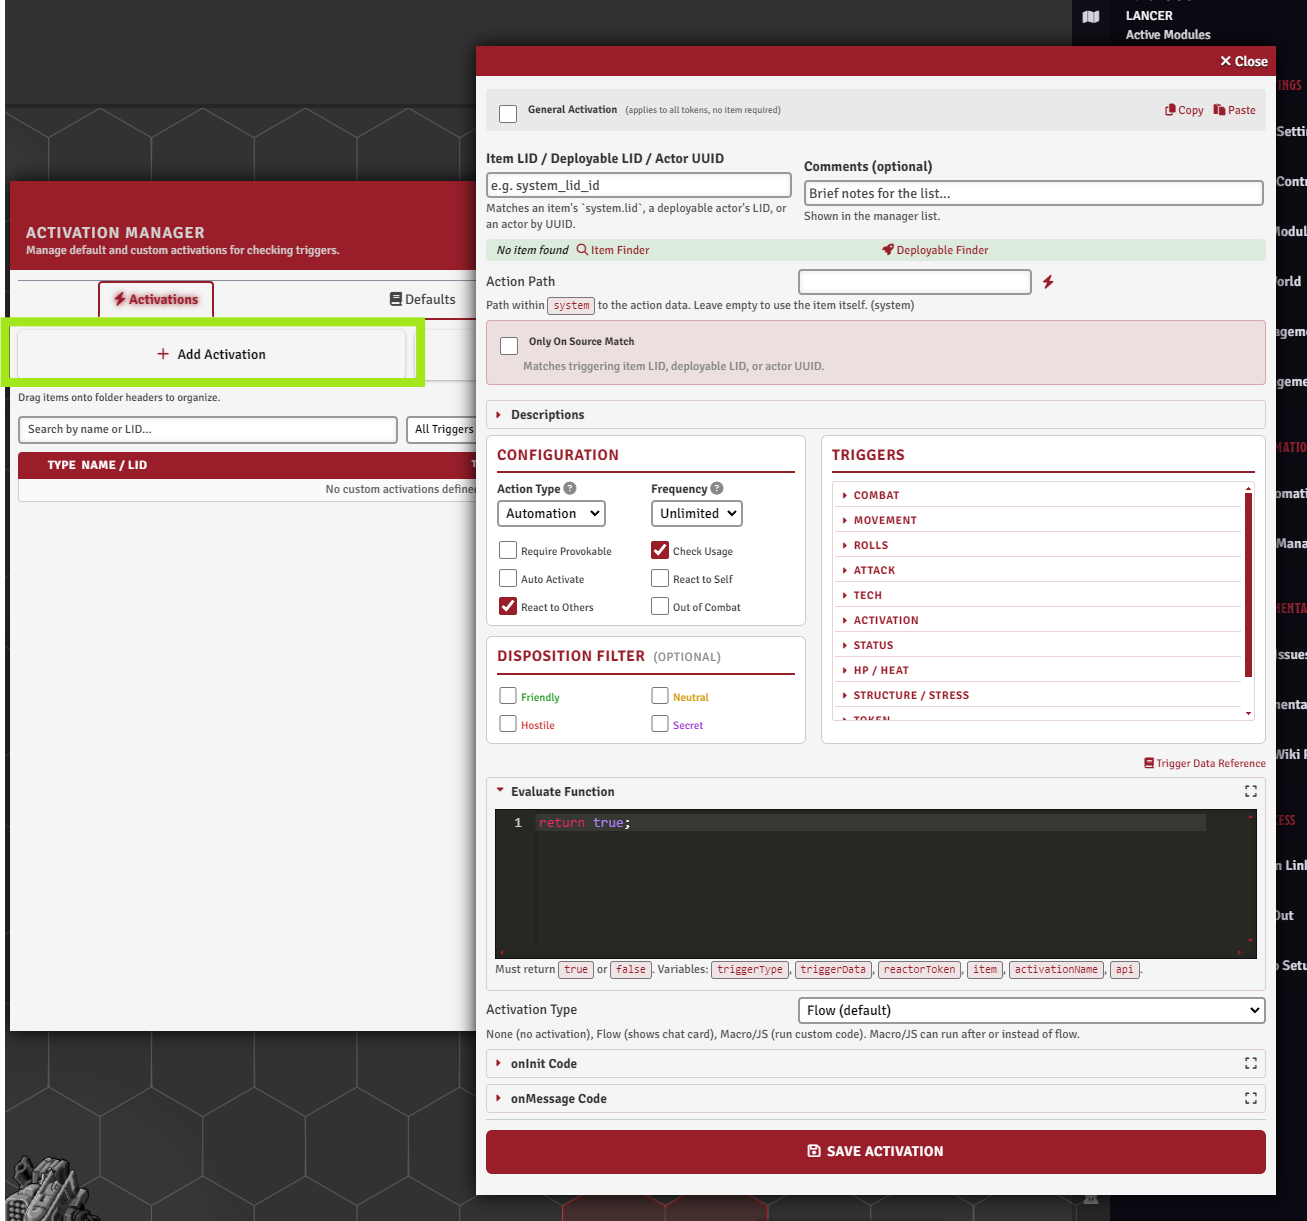
Each activation is a small form. The main fields:
| Group | What you set |
|---|---|
| Triggers | Which game events fire it (onMove, onHit, onActivation, onDeploy, and many more). Full list in Automation System. Custom names go in the Custom field, fired with api.dispatchCustomTrigger(name, data). |
| Mode | How your code composes with the activation's own flow or card: instead of it, or after it. Never the flow that triggered you, which runs either way. Also whether it auto-activates silently (no popup). |
| Filters | Disposition (Friendly / Hostile / Neutral / Secret, plus Token Factions teams), trigger-self / trigger-other, only-on-source-match, require-can-provoke, out-of-combat, scene reactor (evaluate once as the active scene, alongside or instead of the per-token passes), and an optional scene the activation is limited to. |
| Binding | What the automation attaches to: an item LID, a deployable LID, or an Actor UUID, plus an action path to bind one sub-action, the action type (Automation / Reaction / Quick Action / Full Action / ...), and frequency. Note the long forms: it is "Quick Action" here, not the "Quick" short form the TAH extra actions use. |
| Text | Override the trigger and effect descriptions shown in the popup. |
Example: react to your own activation
The smallest useful activation: run your own code when an item's action is used. Exported, a self-reacting onActivation looks like this, trimmed to the fields that matter (a real export carries every field in the form):
{
  "isGeneral": false,
  "lid": "mf_balor_alt_hecatoncheires",
  "name": "",
  "reaction": {
    "triggers": ["onActivation"],
    "evaluate": "return true;",
    "actionType": "Quick Action",
    "frequency": "Unlimited",
    "autoActivate": true,
    "triggerSelf": true,
    "triggerOther": false,
    "outOfCombat": true,
    "onlyOnSourceMatch": false,
    "activationType": "code",
    "activationMode": "instead",
    "activationCode": "ui.notifications.info(\"The Action of this frame is activated\");",
    "reactionPath": "core_system.passive_actions[0]"
  }
}
What makes it self-react on use:
-
triggers: ["onActivation"]- fires when the item's action runs. -
triggerSelf: true(withtriggerOther: false) - the acting token is the reactor, so it reacts to its own action. There is alsotriggerTarget: true- the reactor is one of the event's targets (the one being attacked), usable with both others off for target-only reactions. -
autoActivate: true- runs silently, no popup. -
activationMode: "instead"- your code runs alone."after"also fires the reaction's own flow/card alongside it. Neither touches the flow that triggered you. -
reactionPath: "core_system.passive_actions[0]"- binds to one specific action (here a frame's first core passive). Swap thelidandreactionPathfor your own item and action. DropreactionPathto bind the whole item.
How an activation runs
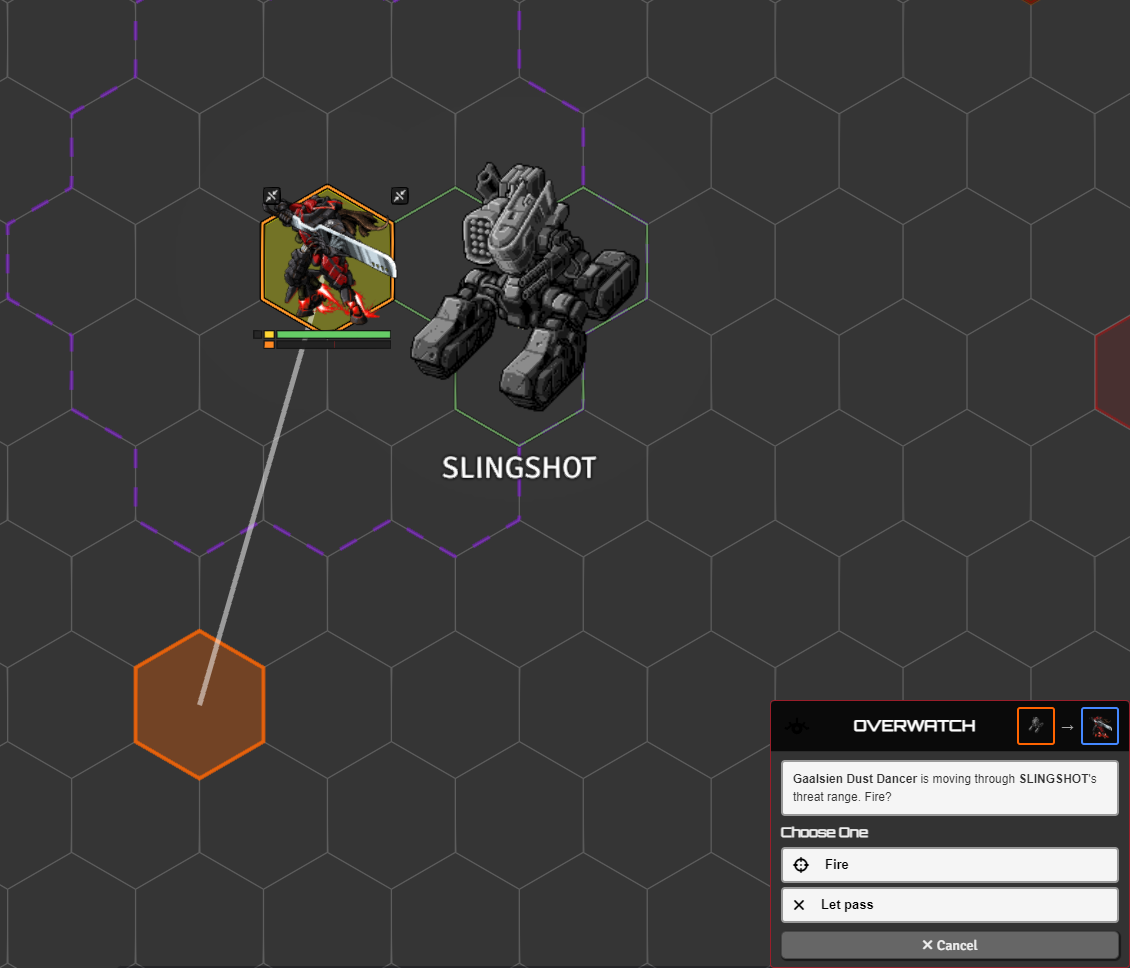
When a trigger fires and the filters pass, three pieces decide the outcome.
Activation type sets what runs: your own code, the item's normal flow, a macro, or none.
The evaluate function runs first, as a final check. Return true to go ahead, false to skip. Use it for conditions the filters can't express, like "only if the target is below half HP".
The activation code is the effect itself, with access to the full api (apply effects, move tokens, place zones, show choice cards, etc.).
There's also an onInit block that runs once when a token is created, for passive setup like constant bonuses or auras.
You write these as plain function bodies, or full functions (the wrapper is stripped for you). The exact arguments each block receives, the order filters run in, and the synchronous rule for cancel and modify triggers are in Automation System.
By default onActivation fires when an item runs through an activation. treatGenericPrintAsActivation also fires it for items printed via Lancer's generic print.
Debugging an automation
Three tools, from quickest to most thorough.
Console logging
console.log works anywhere in your code. For a full picture of what a trigger hands you, call triggerData.debugActivation() inside evaluate or activationCode to dump that call to the console:
- the trigger type, the reactor token, the item, the activation name
- every field on
triggerData - the helper functions available for that specific trigger
Pass a label (debugActivation("before the check")) to name the group when you have several.
It returns the same information as an object, and it's also on the api as api.debugActivation(triggerType, triggerData, reactorToken, item, activationName, label).
Debug mode
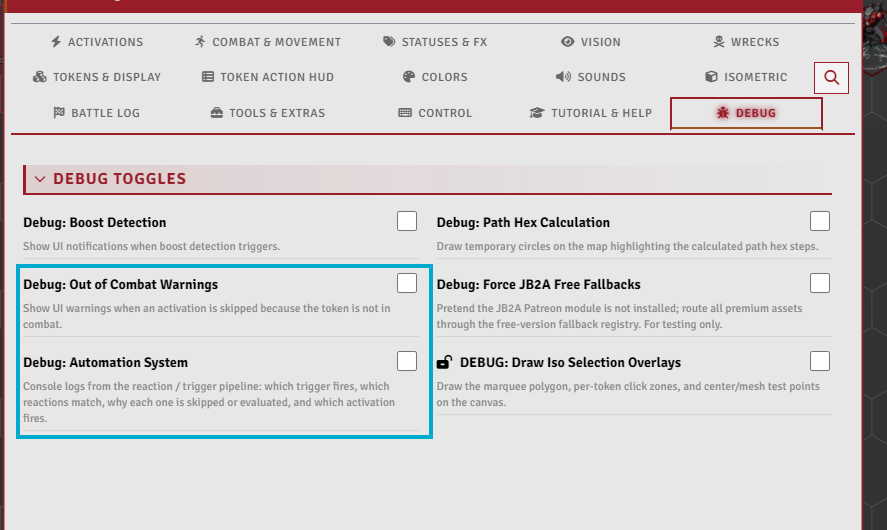
The Debug: Automation System toggle (module settings, Debug tab) logs the whole trigger pipeline: which trigger fires, which activations were candidates, why each one was skipped (out of combat, wrong disposition, no reaction left, evaluate returned false, ...), and which one ran. Turn it on when your automation doesn't fire at all and you want to know where it fell out.
Breakpoints
The most useful tool for understanding what is going on inside an automation.
Your functions are compiled the first time they run, so they don't exist in the devtools until then. The Load for Debug button at the top of the activation editor compiles them immediately:
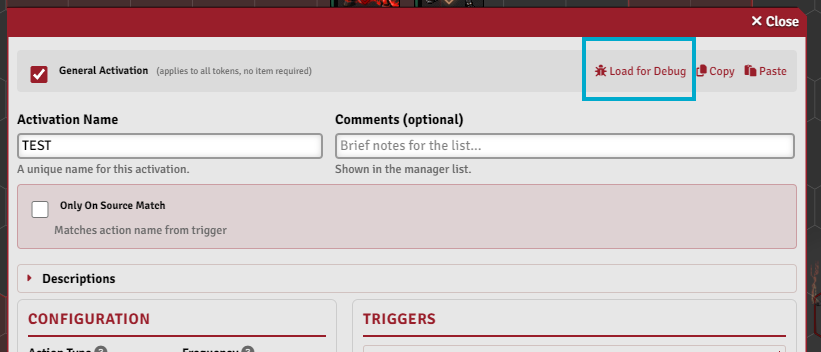
Then in devtools (F12), under Sources, your functions appear as files in modules/lancer-automations/dynamic/, one folder per activation with one file per function (evaluate.js, activation.js, oninit.js, onmessage.js). General activations are named by their activation name. Item activations nest two levels, dynamic/<lid>/<index>/, where the index is the sub-reaction's position, so a multi-reaction item gets one folder per reaction. Click a line number to set a breakpoint.
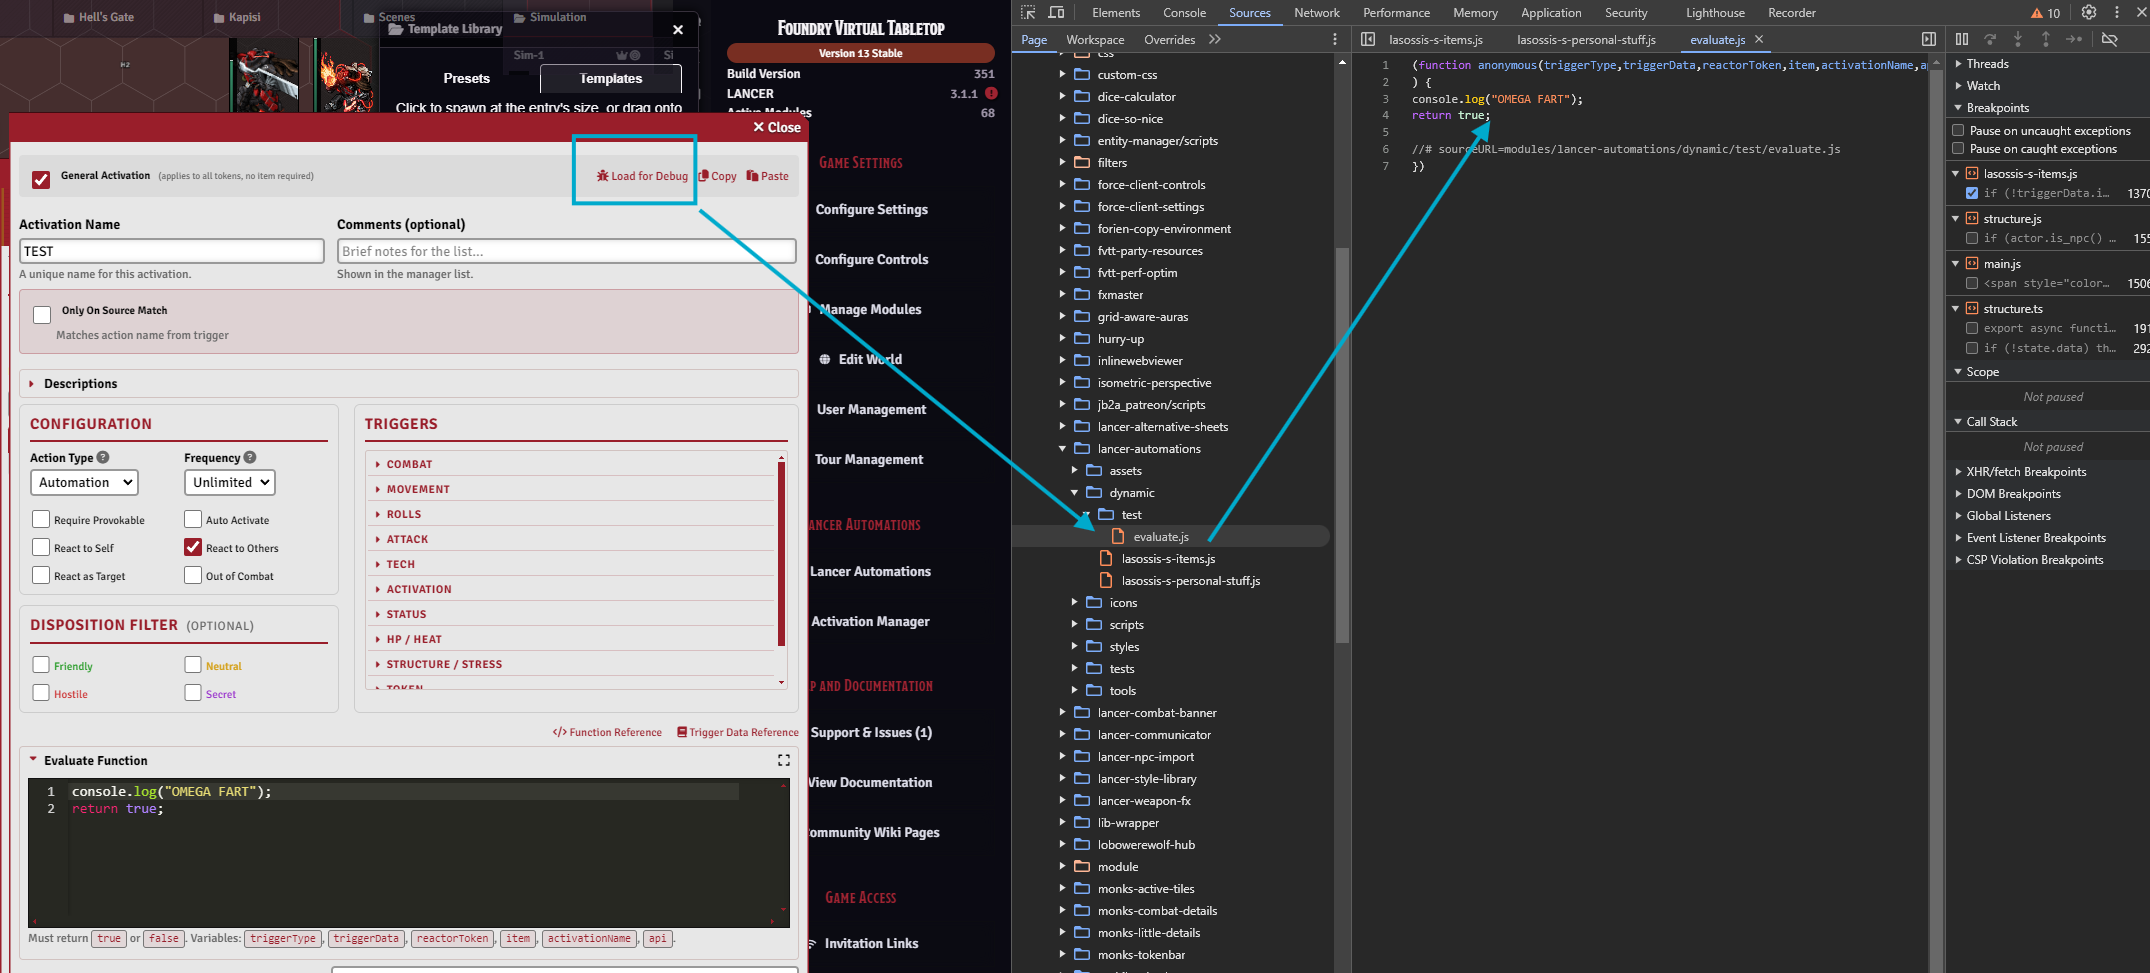
Breakpoints stay armed across triggers, so you can replay the situation as many times as you need.
You can also write debugger; directly in your code: with devtools open, execution pauses on that line without any setup.
The activation popup
When a trigger fires reactions that aren't set to auto-activate, they're collected into a popup, grouped by token. Click an entry to expand its detail panel (trigger text, effect, action type badge, frequency), then click Activate to run it.
- Who sees the popup depends on the
reactionNotificationModesetting: the token's owner, the GM, or both. - Right-click a reaction to open its source item's sheet.
- Only one popup exists at a time. If a second trigger raises its own, the first is closed and its unclicked entries are gone. There is no queue and no pending badge, so anything that must not be missed belongs on auto-activate.
Reaction economy
If consumeReaction is on, the token's reaction for the round is spent when an action whose activation resolves to Reaction runs through a flow. That covers a "flow" activation and any action whose actionType is Reaction. An auto-activating code automation that never launches a flow does not touch the counter. The popup shows the reaction as unavailable once it's spent.
Startup scripts
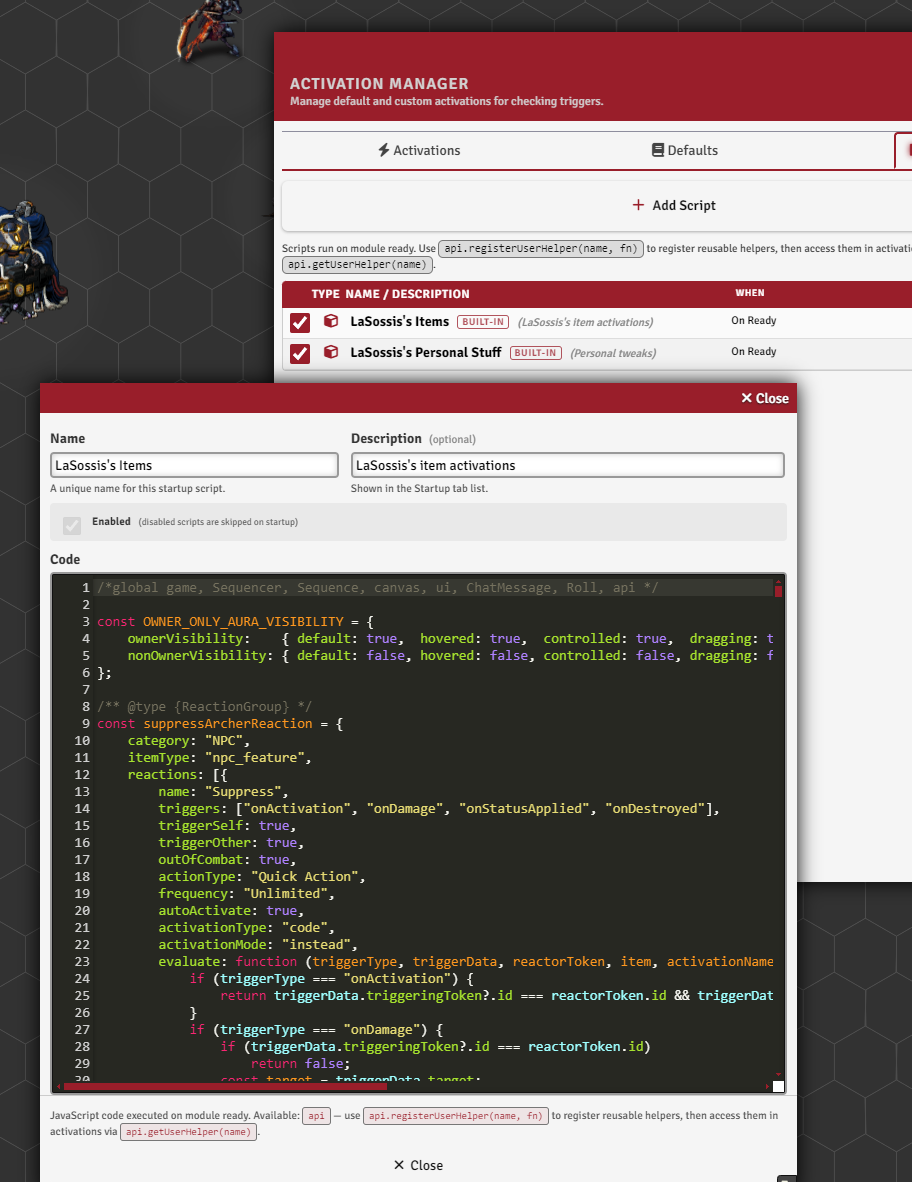
The Startup tab in the Activation Manager holds code that runs once when Foundry is ready, before play starts. The main use is registering helper functions with api.registerUserHelper, callable from any activation or macro.
The registration patterns are in API How-To.
Sharing automations
Copy / Paste in the activation editor moves one activation. Export Pack / Import Pack in the Activation Manager moves a bundle of activations and startup scripts as la-pack-<name>.json, with a summary to pick what applies.
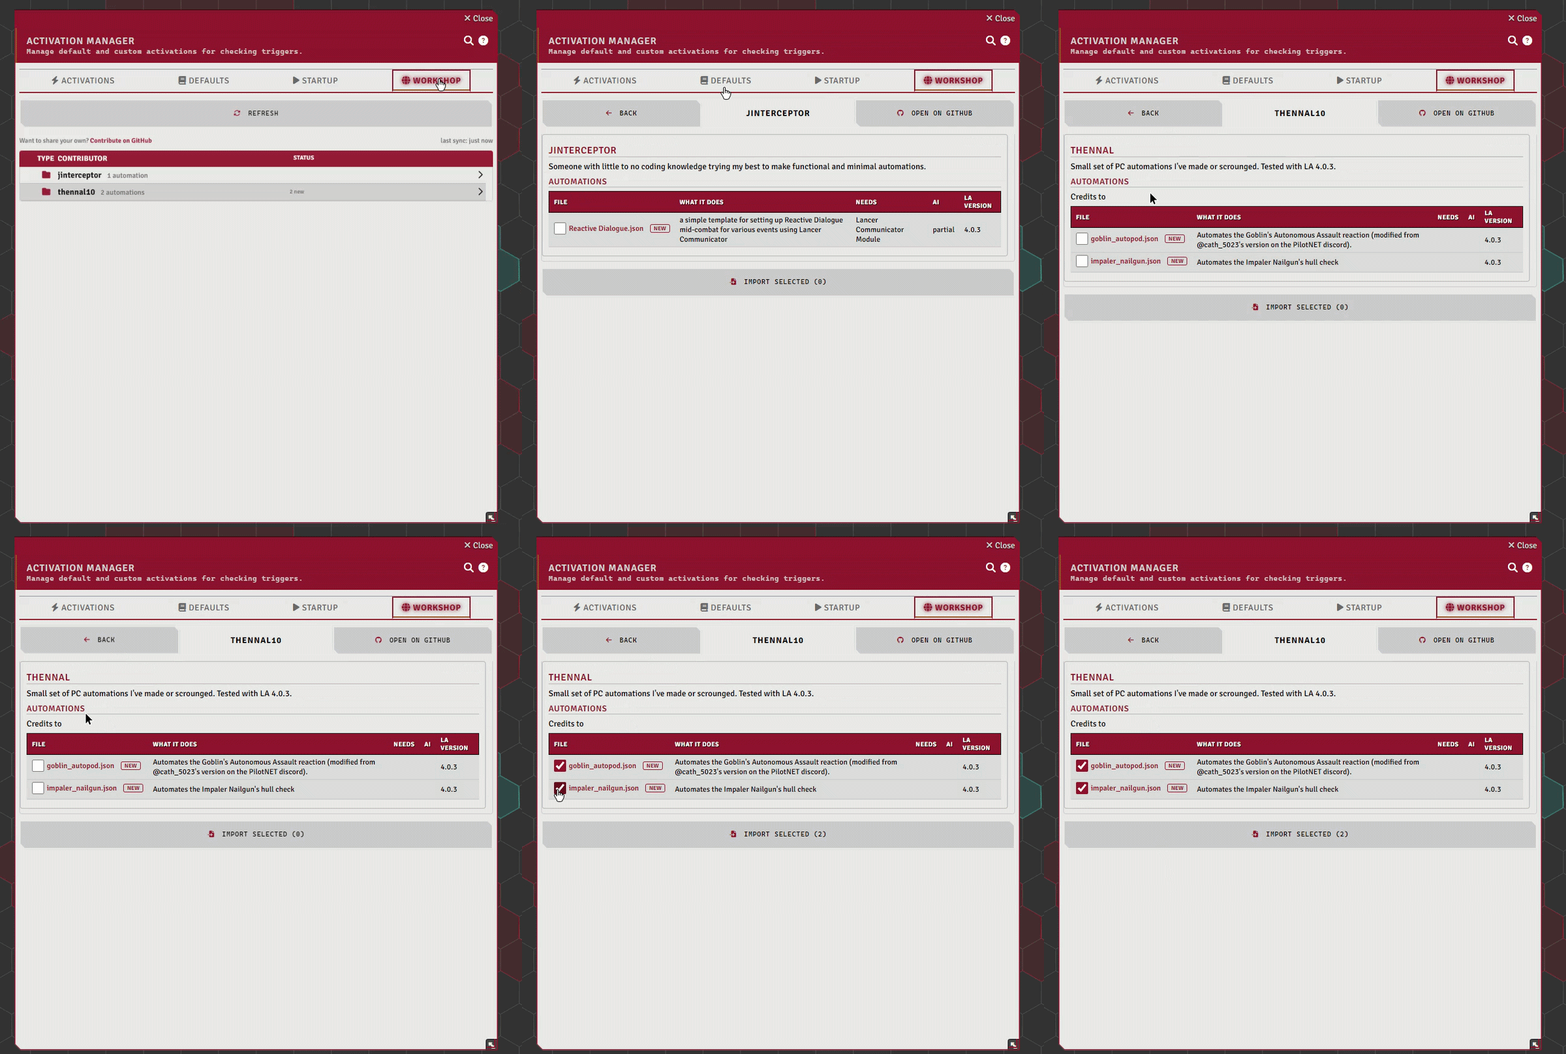
The Workshop is where people share those files. The Workshop tab in the Activation Manager browses and imports it directly. Re-importing a file updates your copy instead of duplicating it.
The personal activation set
Module Settings has a toggle for my personal activation set (enableLaSossisItems): 30+ of my own item automations, with examples like Dispersal Shield, Marker Rifle, and Defense Net. Once enabled, they show in the Activation Manager under the default section. The toggle stays locked until LaSossis Additional statuses and effects (additionalStatuses) is on, since the set applies those statuses.
Note
This is my own stuff, not part of the core module. It's literally the automations I built for my own games (my NPCs, my items), shared as-is. It isn't a complete or general library, and it won't automate your content. Treat it as a set of examples to learn from, not something to rely on.
The worked examples are walked through in NPC Examples, and the patterns for registering your own automations from code are in API How-To.
Some of these deployables aren't in any official LCP. If a personal activation spawns one that won't resolve, import the small companion pack that ships with the module: extra/LaSossis_Npc_Deployables.lcp.